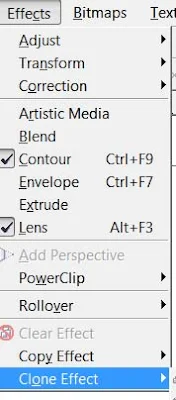
Description of Effect Menu
 1. Adjust jpg, jpeg, png, bmp and others use various types of effects on image files like contrast, enhanced, Tone Curve Colors balance Hue saturation
2. Transform In this also, color effects on any Png and JPG files are used to color the opposite.
- DeInterlace (lets you remove lines from scanned or interlaced images ) Sometimes while scanning an image, the effect starts coming like a lining, using the same line to remove it with the help of it, although more or less it becomes a mild mesh. You can set it according to the odd and even line.
- Invert Use it to opposite the color of your image, you can also call it negative.
- Posterize lets you reduce the number of tonal values in an image. Posterize removes gradations and creates larger areas of flat color.
4. Artistic Media Artistic media is used to set the brush, as soon as you take a shape, the artistic brush will immediately turn into Artistic and you will see the last used brush at the top as soon as you open it.
5. Blend Use of it has been told in the tool box itself, however, if you open from here, a docker will open in which you can blend according to the number of steps.
6. Contour Its use has also been mentioned in the tool box, on opening it, the docker will open in which after selecting To Center, Inside, Outside, you write to keep the offset in inches, and other steps in it, the layer you need It is written as it is. If you want to use it without this docker, after selecting it from your tool box, after going to the property bar and setting a point, the object on which you drag it will come with a Framing Effect.
7. Envelope Like Blend, Contour mentioned above, it will also open in this, after selecting any object you have to use it like a Shape tool, but if you are using Docker. Then you will get the option of Add New and Add Preset in which you can create your own shape with the help of Add New and using the pre-made shape with the help of Add Preset. Which the company keeps adding to it at the time of software development.
8. Extrude It has been told to you in the tool box that if you want to use from here, on opening, a docker will open in which after selecting the object or text, you can click on the edit button and apply the vanishing point by applying the 3D effect. And you can also see its preview. After applying all the effects, the effect is applied to the text or object.
9. Lens It is used as a layer that shows the trailing object or text in effect while any trailing object makes a difference. As soon as Frozen is clicked, it is copied and added to the layer above it. Which you can re-group and add your effect or any color. In this, you will get a lot of effects, whose name is- Brighten, Color Add, Color Limit Custom Color Map, Fish Eye, Heat Map, Invert, Magnify, Tinted Gray Scale, Transparency, Wire Frame. Click here to see all the effects
10. Add Perspective It is used on converted artistic text. By applying it on any shape, it feels like it is stuck. While using it, you will see four nudges in which you use to apply it according to the shape.
11. Power Clip Inside It is used to place text or photos inside any shape. You can also drag it with the right button of the mouse, in this you will get the power clip inside which is used for most images. If you want to use any change in the image after applying it to reduce the size, then right-click on it, after editing the content, adjust the image and right-click again and click on Finish Editing. Or click on the power clipped image with Ctrl After editing, click on any empty part of the page with Ctrl.
12. Add Rollover With this help, we use to add hyperlinks to any object. Which you have to use while staying in the coral draw. After applying it, you have to right click and click on Jump to Hyperlink in Browser, which will open the hyperlink you have added to the Internet Explorer.
13. Clear Effect Used to remove the effect applied.
14. Copy Effect/Clone Effect With the help of these two, we use the effect to copy. It is used by taking a simple shape and if you select the shape with the effect applied and go to this option, then it will look like a head. Just like you have taken two objects and have written some text for both, give a Perspective effect on one while nothing on the other. Now you can click on the simple text and select that text by clicking on the perspective from the copy effect from the effect menu. If you click on the effect, as soon as you click, your simple text will also be changed to the same effect as before.


0 Comments
Please don't Add spam links,
if you want backlinks from my blog contact me on rakeshmgs.in@gmail.com